Jira automation examples: rules that create your tickets for you
Practical Jira automation examples and rules: auto-create sub-tasks, auto-assign, schedule recurring tickets, and fire templated issues from one trigger.
Most Jira teams already know the pain. A customer signs up and someone manually opens the same five onboarding tasks. An incident lands and an engineer recreates the same checklist they built last month, minus the two steps they forgot. A monthly report is due, so a project lead copies last quarter’s ticket and edits the dates. Every one of these is repetitive, predictable work, and every one of them is a candidate for automation.
The good news is that none of it needs custom code. A Jira automation rule is just three parts: a trigger (the event), an optional condition (a filter that refines it), and an action (what happens). When the trigger fires and the condition passes, the action runs on its own. The examples below are the rules worth setting up first, ordered roughly from quick wins to full workflows. One of the most powerful actions a rule can take is to create a fully structured issue from a template, so we close with how automation and templates work together. If you want the issues those rules produce to arrive complete, the issue template library is the place to browse ready-made starting points.
How Jira automation works (trigger, condition, action)
Before the recipes, the anatomy. Every automation rule in Jira, project-level or global, is built from the same three blocks:
- Trigger. The event that wakes the rule up: an issue is created, a field changes, a status transitions, a comment is added, or a schedule ticks over. A rule has exactly one trigger.
- Condition. An optional filter that decides whether to continue. Conditions let one rule serve many cases: only act when the priority is Highest, only when the issue type is Bug, only when a field is empty. If the condition fails, the rule stops quietly.
- Action. What the rule actually does: assign the issue, create sub-tasks, transition it, send a notification, edit fields, or create a whole new issue from a template.
Read every recipe below as Trigger then Condition then Action and the rules stop feeling like magic. For the click-by-click setup of any individual rule, the automation integration guide is the step-by-step reference; this post stays at the examples-and-strategy layer.
10 Jira automation examples worth setting up
These are the rules that pay for themselves fastest. Each is written as a recipe you can recreate in your own instance.
Auto-create sub-tasks when an issue is created
Trigger: issue created. Condition: issue type is Story (or whatever parent you want). Action: create a fixed set of sub-tasks, for example a Definition-of-Done or QA checklist of five standard items, with their fields pre-populated. Every new Story arrives with the same scaffolding so nobody forgets the design review or the test pass. When the work you repeat is a simple checklist of tasks, a ready-made task template gives you the structure to clone.
Auto-assign issues by component, priority or round-robin
Trigger: issue created. Condition: assignee is empty. Action: set the assignee. Route by the affected component (front-end bugs to the front-end team), by priority (criticals straight to a lead), or round-robin across a group so the load spreads evenly. No manager has to play traffic cop.
Keep parent and sub-tasks in sync
Trigger: a sub-task transitions to In Progress. Condition: the parent is still in To Do. Action: transition the parent to In Progress. A small rule, but it keeps the board honest: a parent never sits idle while its children are clearly moving.
Auto-triage new bugs
Trigger: issue created. Condition: issue type is Bug. Action: add a triage label, set a default priority, and create the standard investigation sub-tasks. The bug lands ready for a human decision instead of a blank shell. Start from a structured bug report template so the reported fields are consistent before the rule ever runs.
Schedule recurring tickets
Trigger: scheduled (a cron-style cadence). Action: create the recurring work order, for instance a weekly maintenance task or a monthly compliance review, so it appears on a fixed rhythm and nobody has to remember it. Scheduled triggers are how you turn “we should do this every month” into a ticket that simply shows up.
Onboard a new customer or hire from one trigger
Trigger: a signup, a form submission, or an issue created in an intake project. Action: create the onboarding Epic with all of its Stories and sub-tasks, passing the customer or employee name straight into the structure. One event, a complete onboarding plan.
Auto-respond and close stale tickets
Trigger: scheduled, scanning for issues with no update in N days. Condition: status is Waiting for Customer. Action: post a reminder comment, and if there is still no response after a grace period, transition the issue to Closed. Stale tickets stop clogging the queue without anyone babysitting them.
Spin up an incident-response structure on triage
Trigger: issue transitions to a status like Triaged. Condition: the issue is in the incident project. Action: create the incident-response Epic with its triage, communication, root-cause and post-incident review sub-tasks. The full response structure exists the moment an incident is confirmed. For the content of that structure, adapt the ITSM incident report template.
Create a whole hierarchy in one launch
Trigger: any of the events above. Action: launch a template that holds a whole Epic-and-sub-task hierarchy, creating the entire tree in one launch. This is how you stand up a complete slice of work, the Epic, its Stories and their sub-tasks, in a single step rather than issue by issue. Later, when you need to locate everything the template produced, the templateKey JQL field finds issues created from a template for saved filters, dashboards and reports.
Fire a fully structured issue from a template
Trigger: any of the events above. Action: create an issue from a template rather than a blank one, so the rule produces a complete Epic-and-sub-task hierarchy with links and pre-filled fields in a single step. This is the bridge between automation and templates, and it is what the next section is about.
Combine automation with templates for consistency
A rule that creates one blank issue is useful. A rule that creates a whole structured Epic, with its Stories, sub-tasks, links and standard fields already in place, is a different level of leverage. That is what happens when the action of an automation rule is “create from a template” instead of “create issue.”
The division of labour is clean. A template captures the shape of the work: the summary, description, fields, sub-tasks, links and full Epic hierarchy you want every time. Automation supplies the trigger: the event that decides when that work should appear. Variables fill the parts that change, and the same answer can be reused across the parent and every sub-task, so the rule never has to know anything about the internal structure of the work. It just says “create this,” and the template handles the rest. For values the system can supply on its own, such as the current date or the triggering user, smart values plug straight in.
The honest caveat: automation amplifies whatever you give it. A sloppy template that auto-fires a hundred times a week is worse than a clean one you run by hand. So get the template right first, then automate it. Here is the pairing, end to end.
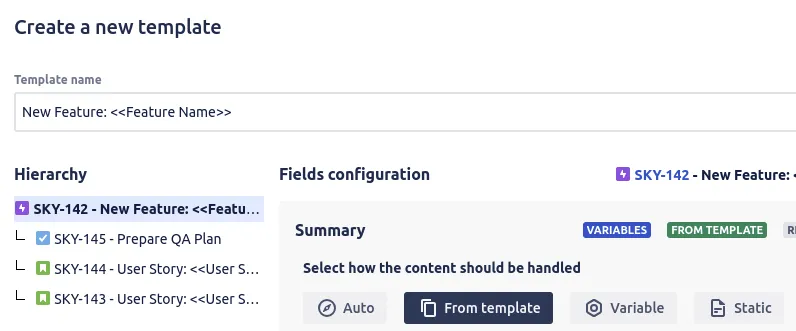
- Build the template. Start from a real issue that already looks the way you want the output to look. Open it, click the three-dot actions menu, and choose Save as new template. The step-by-step guide to creating templates covers each option; confirm which fields, sub-tasks and links to include, then save. Saving an Epic with its Stories and sub-tasks recreates the whole hierarchy in one action.
- Add variables for the parts that change. A variable is a placeholder you fill at create time, in text, dropdown or date form. Define
customer_nameonce and reference it in the Epic summary, the Story descriptions and every sub-task; at create time you type the value a single time and it flows everywhere. - Run the template by hand once. Before you automate, create an issue from your template from the Apps menu to confirm it produces what you expect. You can prefill the create screen so a person reviews before saving, or skip it for a fully hands-off result.
- Let an automation rule pull the trigger. In project or global automation, create a rule whose trigger matches your event, then have its action create the issue from your template. The pattern is always the same: an event happens, the rule wakes up, a template-shaped issue appears.
A worked incident-response flow makes it concrete. Build an Epic template called “Incident response” with sub-tasks for triage, communication, root-cause analysis and a post-incident review, plus a severity dropdown and an affected_service text variable reused across the hierarchy. Run it by hand once to confirm the links are right. Then add a rule: when an issue in the incident project transitions to Triaged, create the “Incident response” Epic from the template, passing severity and the service name through. From then on, the moment an incident is triaged, the full response structure exists, consistently, with no copy-paste.
Permissions and guardrails for automated issues
Once a workflow runs on its own, permissions stop being a nice-to-have. Process Templates for Jira lets you scope templates to a single project or make them global, and gives you permission management over who can use, edit and manage each one. Pair that with Jira’s own issue security where generated tickets need restricted visibility. The goal is simple: automated issues land in the right project, with the right access, every time. Because the data behind your templates lives on a dedicated EU backend (DigitalOcean, Frankfurt), with no personal data stored, automated workflows that touch customer-facing processes stay on solid ground.
Going further
Templates also support custom fields, native Tempo Timesheet Account fields, a dashboard gadget for quick access, and dark mode. The advanced usage guide is the place to go once the basics are humming. New to the app altogether? Start with getting started, then come back and automate.
These ideas plug straight into broader process work. For development teams, see the best practices for using Jira in software development; for service teams, the ITSM best practices in Jira guide shows where automated, templated issues fit.
Process Templates for Jira is built on Atlassian Forge, is Cloud Fortified, and is used by 400+ teams with a 4.6 out of 5 rating across 20 reviews. It is free for up to 10 users, then 0.50 USD per user per month, with a 30-day trial and no credit card.
Install it from the Atlassian Marketplace, then browse the issue template library to find the structured Epic, Story or Bug you want a single automation rule to create for you from now on.
Frequently asked questions
What are the most useful Jira automation examples?
How do Jira automation rules work?
Can Jira automatically create sub-tasks?
Do I need Jira Automation to use Process Templates for Jira?
Is Process Templates for Jira free?
Found this helpful? Share it.
Ready to template Jira tickets?
Install Process Templates for Jira from the Atlassian Marketplace. Free up to 10 users, 30-day trial above that.